Android で独自定義のカスタムアニメーションを作りたかったので試してみたところ、 Animation クラスを継承して割と簡単に作れたのでメモ。
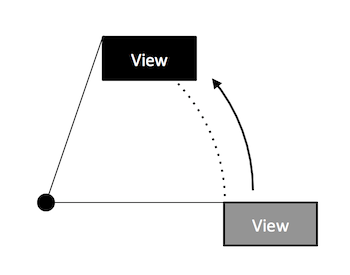
ここでは例として、 View を円周に沿って動かすようなアニメーションを作ってみました。
アニメーションさせたい View に対して中心点を指定して、開始角度と終了角度を与えてアニメーションさせてみます。
1
2
3
4
5
6
7
8
9
10
11
| /**
* 円弧上に沿うように移動させるアニメーション
* @param startDegrees 開始角度
* @param endDegrees 終了角度
* @param centerXType 中心点のX座標のタイプ
* @param centerXValue 中心点のX座標を表す値
* @param centerYType 中心点のY座標のタイプ
* @param centerYValue 中心点のY座標を表す値
*/
public ArcTranslateAnimation(int startDegrees, int endDegrees,
int centerXType, float centerXValue, int centerYType, float centerYValue);
|
コンストラクタ
今回はパラメータを受け取るだけ。
1
2
3
4
5
6
7
8
9
| public ArcTranslateAnimation(int startDegrees, int endDegrees,
int centerXType, float centerXValue, int centerYType, float centerYValue) {
this.mStartRad = (float)(startDegrees * Math.PI / 180.0f);
this.mEndRad = (float)(endDegrees * Math.PI / 180.0f);
this.mCenterXType = centerXType;
this.mCenterXValue = centerXValue;
this.mCenterYType = centerYType;
this.mCenterYValue = centerYValue;
}
|
initialize()
まず initialize() で View の座標やサイズなどの情報を取得します。
他のアニメーションに倣い、回転の中心点を指定するときに絶対的(Animation.ABSOLUTE)か相対的(Animation.RELATIVE_TO_SELF)か、親基準で相対的(Animation.RELATIVE_TO_PARENT)かを選べるようにしてみましたが、このあたりは resolveSize() メソッドを使うことで容易に座標に変換できます。
1
2
3
4
5
6
7
8
9
10
11
12
13
14
| @Override
public void initialize(int width, int height, int parentWidth,
int parentHeight) {
super.initialize(width, height, parentWidth, parentHeight);
float fromX = resolveSize(Animation.ABSOLUTE, 0, width, parentWidth);
float fromY = resolveSize(Animation.ABSOLUTE, 0, height, parentHeight);
float centerX = resolveSize(mCenterXType, mCenterXValue, width, parentWidth);
float centerY = resolveSize(mCenterYType, mCenterYValue, height, parentHeight);
mDeltaRad = (float)Math.atan2(fromY - centerY, fromX - centerX);
mRadius = (float)Math.sqrt(Math.pow(fromX - centerX, 2) + Math.pow(fromY - centerY, 2));
mStartPoint = new Point((int)(fromX - centerX), (int)(fromY - centerY));
}
|
中心点の座標がとれたので、開始地点と中心点における初期角度、円の半径、開始点などを保存しておきます。
applyTransformation()
applyTransformation() がアニメーションのキモで、引数として渡される interpolatedTime パラメータに 0.0f – 1.0f でアニメーションの進行値が入ってくるので、その値に合わせて表示を変更してやります。 ちなみに interpolatedTime は Interpolator が適用された値が設定されているようなので、与えられた値をそのまま進行の割合として信じれば良さそうです。
表示を変更するには、同じく引数として渡される t パラメータに対して操作を行えば OK です。 位置やサイズを変更するなら getMatrix() で参照できる Matrix インスタンスを操作し、アルファ値を変更するなら setAlpha() でアルファ値を設定します。
1
2
3
4
5
6
7
8
9
10
11
12
| private PointF getArcPoint(float interpolatedTime) {
float rad = mStartRad + (mEndRad - mStartRad) * interpolatedTime + mDeltaRad;
float dx = (float)(Math.cos(rad) * mRadius);
float dy = (float)(Math.sin(rad) * mRadius);
return new PointF(dx - mStartPoint.x, dy - mStartPoint.y);
}
@Override
protected void applyTransformation(float interpolatedTime, Transformation t) {
PointF p = getArcPoint(interpolatedTime);
t.getMatrix().postTranslate(p.x, p.y);
}
|
今回は Translate アニメーションなので、 getArcPoint() で座標を決定したら Matrix#postTranslate() で位置を移動してやります。
カスタムアニメーションを使用する
これで普通の Animation と同じように使うことができます。
使用例1
2
3
4
5
6
7
8
9
10
11
12
13
14
| View target = findViewById(R.id.targetView);
Animation anim1 = new ArcTranslateAnimation(0, 90, Animation.ABSOLUTE, -300, Animation.ABSOLUTE, 0);
anim1.setDuration(1000);
anim1.setFillEnabled(true);
anim1.setFillAfter(true);
target.startAnimation(anim1);
Animation anim2 = new ArcTranslateAnimation(90, 0, Animation.ABSOLUTE, -300, Animation.ABSOLUTE, 0);
anim2.setStartOffset(1000);
anim2.setDuration(1000);
anim2.setFillEnabled(true);
anim2.setFillAfter(true);
target.startAnimation(anim2);
|
もちろん AnimationSet で使うこともできます。
ArcTranslateAnimation クラス全容
最後に今回作成した ArcTranslateAnimation クラスを置いておきます。